

Upload Images to Amazon S3 Using NodeJs and React: A Step-by-Step Guide
Get started with Amazon S3 Client, bucket container and upload/retrieving images using NodeJs and React.


What is the Amazon S3 Client? 🤔
Before we dive into code, I am going to give you a simple intro to what Amazon S3 Client is and why we should use it in the first place.
✅ If you are already familiar with what Amazon S3 Client is, you can just skip ahead.
Using the Amazon S3 Client to store and retrieve images in a MERN app offers several benefits over storing images directly in the app's database or file system. Without the Amazon S3 Client, large file sizes can result in performance issues, limited storage can lead to data loss or poor user experience, and storing images directly can pose security risks. On the other hand, using the Amazon S3 service provides scalability, cost-effectiveness, and security features such as encryption and access control. Therefore, using the Amazon S3 Client is a better choice when dealing with large volumes of images in a MERN app, while not using it can lead to various negative consequences.
Overview 🚀
Uploading images to Amazon S3 using NodeJs and React involves a few simple steps. Here is an overview of the process:
Create an S3 bucket in the AWS console to store your images.
Set up the AWS SDK for JavaScript in your React app.
Create a form in your React app that allows users to select and upload images.
Use the AWS SDK to upload the selected images to your S3 bucket.
Retrieve the URLs of the uploaded images from your S3 bucket and display them in your React app.
These steps may seem complex at first, but with the right guidance and resources, you can easily implement them in your React app. In the following sections, we'll provide a step-by-step guide to help you upload images to Amazon S3 using NodeJs and React.
💡 Prior knowledge of React.js and Node.js is assumed for this guide.
S3 bucket in the AWS 📥
First of all, if you don't have AWS account, 👉 Go here and signup for a free tier.
First, Login to AWS Console as a Root user 💻
Creating an S3 Bucket 🆕
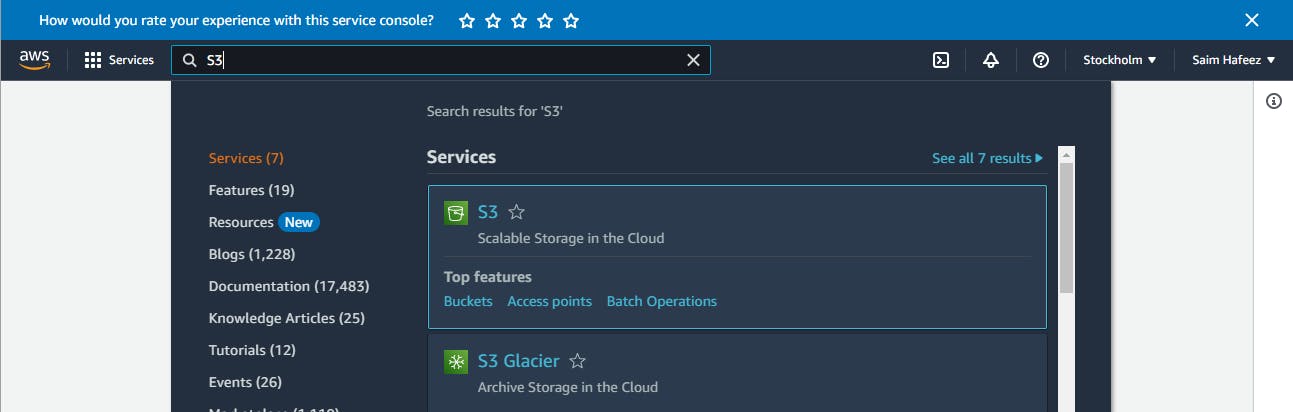
After login, Search for S3 and you should see S3 under Services. Open it
You will see the following, simply click on Create Bucket Button

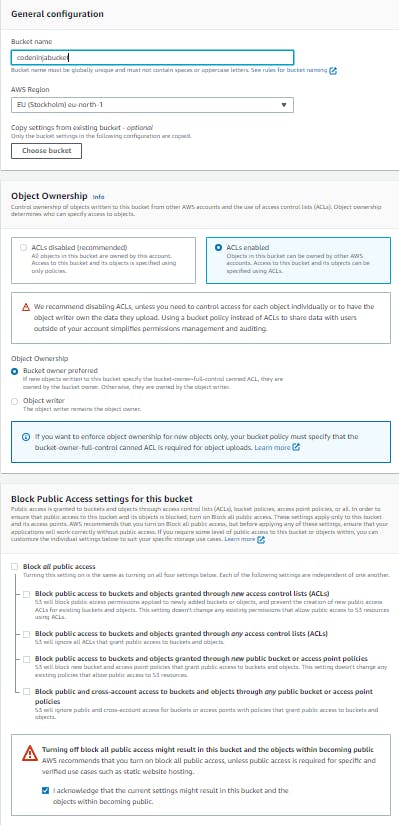
Bucket Configurations ⚙️
Once you are at the Bucket Configuration page, change/add following
Add a Bucket Name.
Under Object Ownership Select ACLs enabled.
Next Uncheck the Block all public access checkbox.
(Optional) Select AWS Region nearest to your location.
Creating bucket user - Security Credentials 🔒
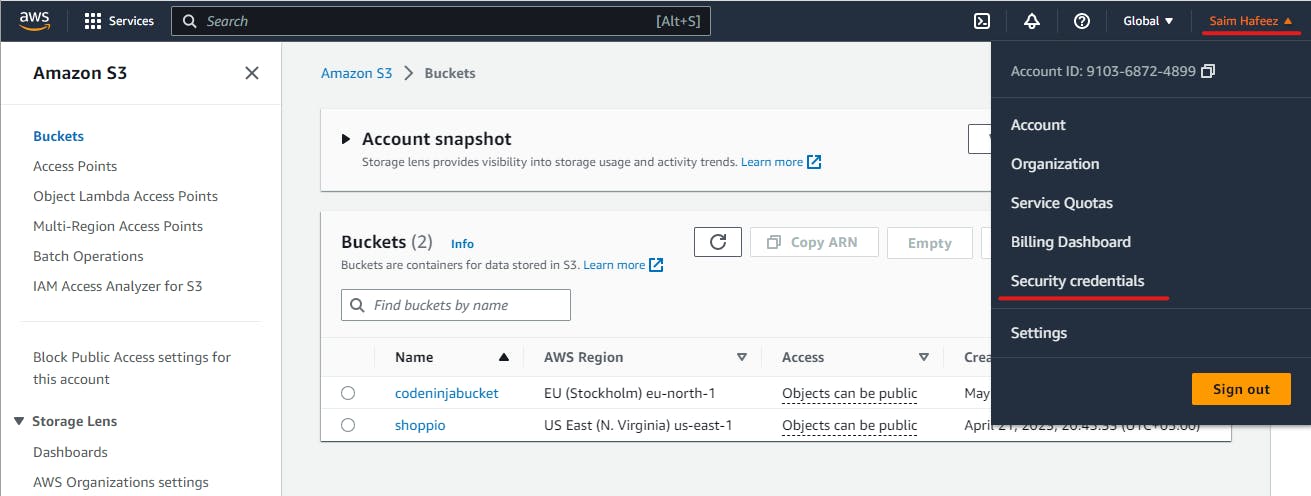
After the Successful creation of a Bucket, you will be redirected back to the Bucket List page. from there expand the menu by clicking on your name in the present on the right side of the header and then select Security credentials.
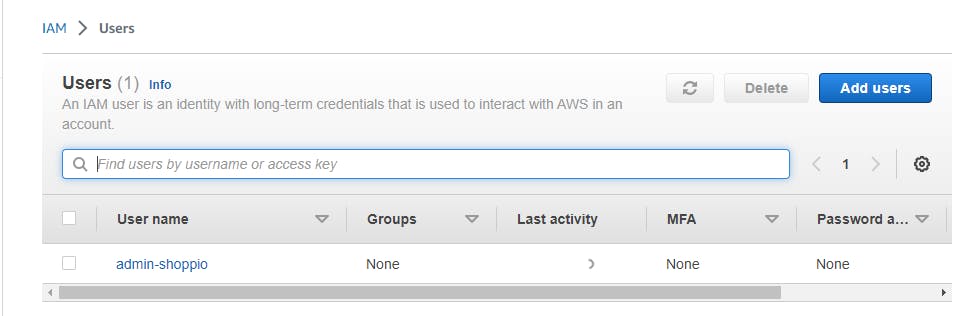
After that, you will see various options in the left sidebar, and open users option.

Now Click on Add users button to create a new user.
Now do following
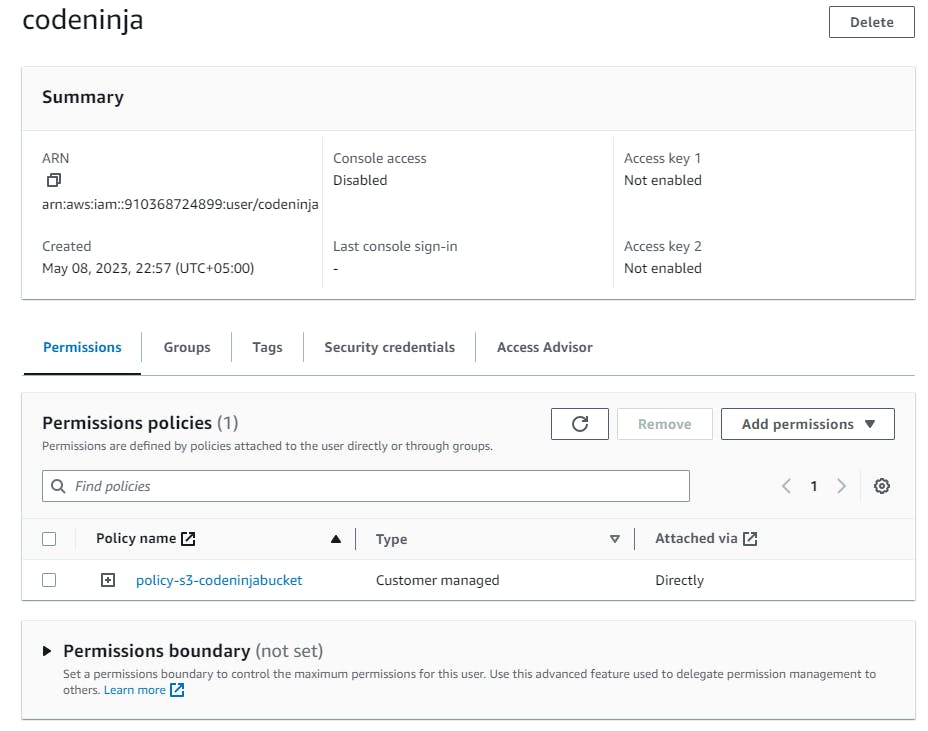
Set a unique User name (codeninja in my case) and click next
Now under Permissions Options, select Attach policies directly option.
then Just below it Click on Create policy and when the new page loads, search for s3 under Select a services tab and select it.
Now Select the Following checkboxes
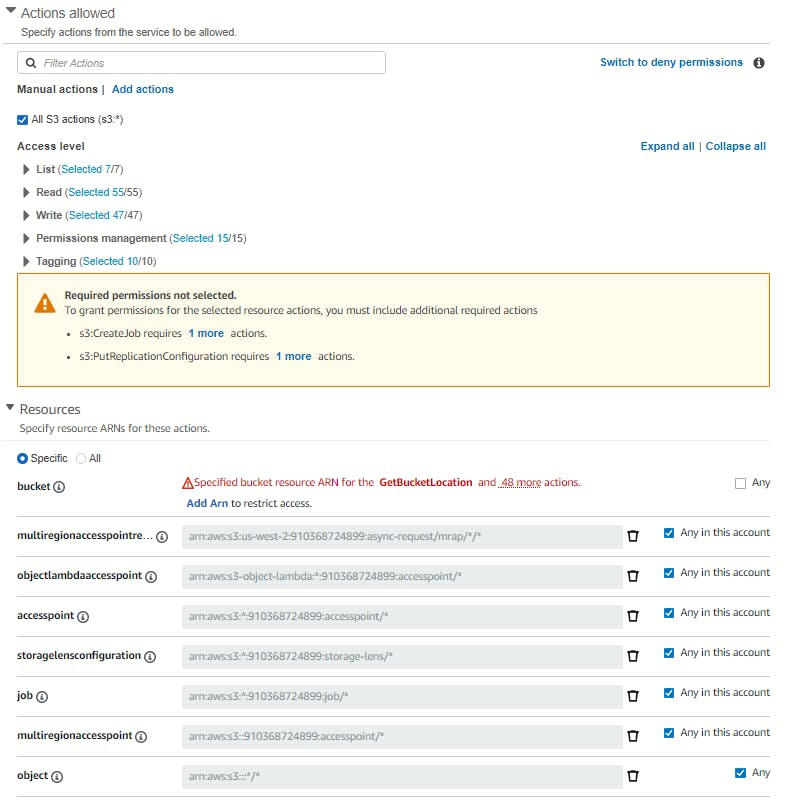
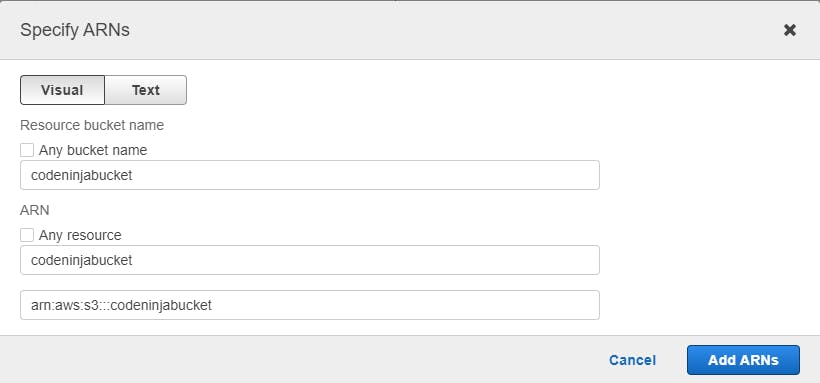
Now Click on Add Arn under 'bucket' and type the bucket name you created previously, add arn and press next.
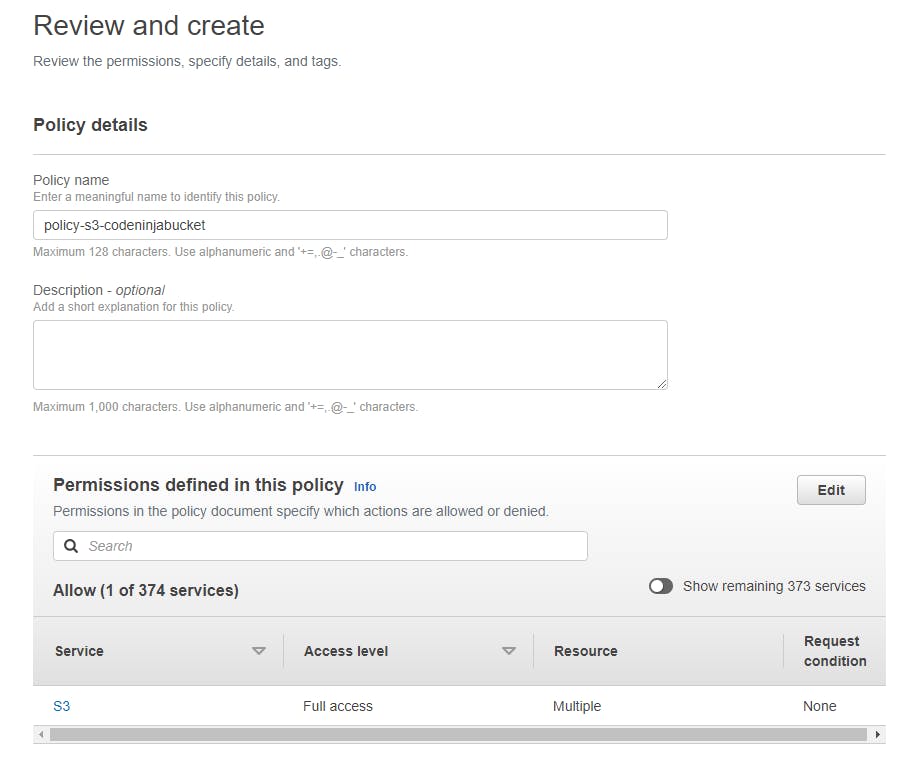
keep clicking next, until you have reached Review and create. From there add policy name and click create policy button
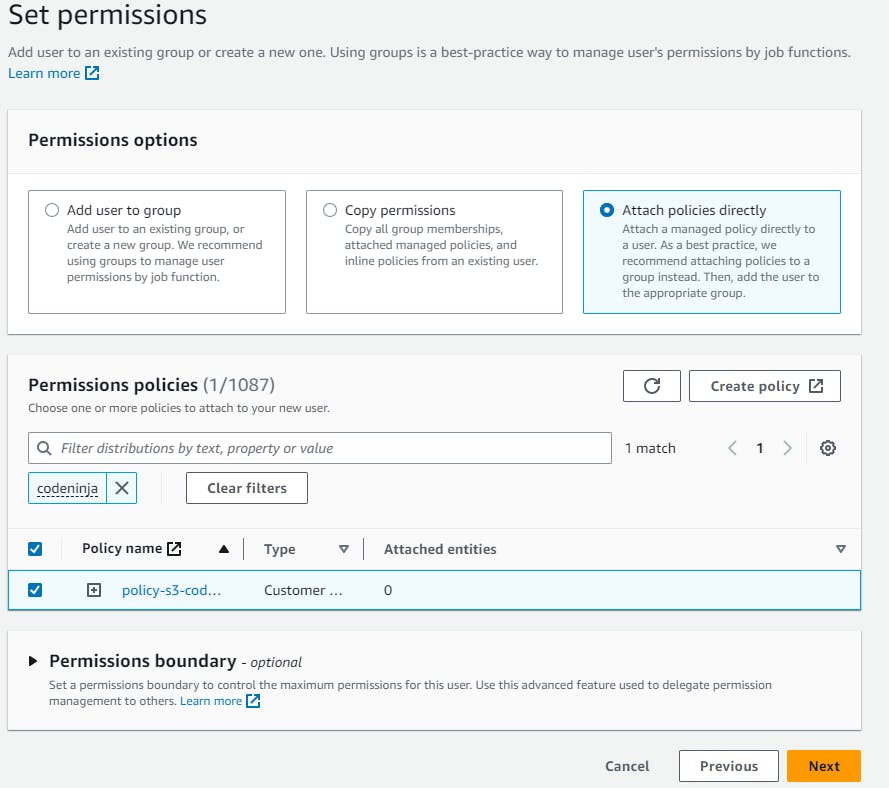
Once the policy is created go back to previous Set permissions page, refresh it and then search for the newly created policy, select it and press Next button.
Now press create user button, then select your newly created user by clicking on its User name, this will open a new page.
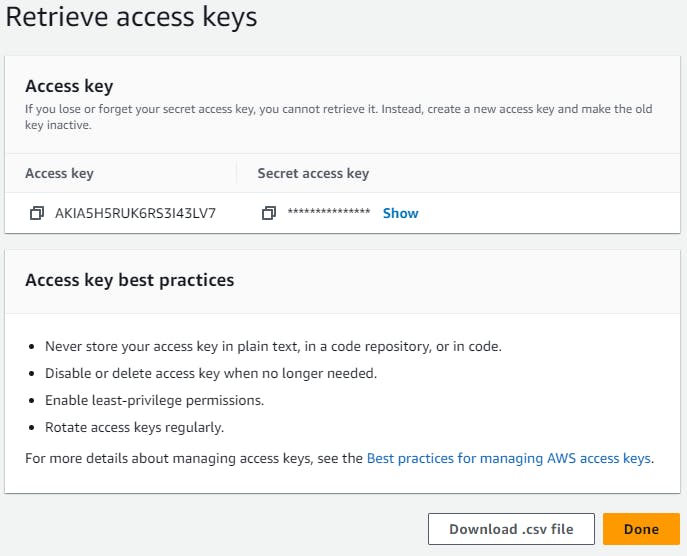
Now go to the Security credentials tab and click on Generate access key.
Choose Application running outside AWS Option.
Just Click next, no further changes are required and just before done you will have the Access key and Password, save it somewhere safe (will be used later in the code to connect to the bucket) and click Done.
Uploading Images via S3 Client 🖼️💾🚀
I have made a simple form for uploading the images and it's embedded below. Play around with it, get to know it and move to the next.
Installing Dependencies 📦
we need the following dependencies for the uploadImages function to work properly.
mime-typesis a package used for determining the MIME type of a file based on its filename or contents. This is used in the code to specify the content type of each uploaded file when it is stored in Amazon S3.multipartyis a package used for parsing incoming HTTP requests with multipart/form-data payloads. This is used in the code to extract the fields and files that were uploaded as part of the request.fsis a built-in Node.js package used for working with the file system. This is used in the code to read the contents of each uploaded file from the disk before uploading it to Amazon S3.@aws-sdk/client-s3is an AWS SDK package for Node.js used for interacting with Amazon S3. This is used in the code to create an S3 client object and upload the files to the specified S3 bucket.
Install the dependencies by the following npm command.
npm install mime-types multiparty @aws-sdk/client-s3
In case of yarn
yarn add mime-types multiparty @aws-sdk/client-s3
Finally import the dependencies in your project.
const mime = require("mime-types");
const multiparty = require("multiparty");
const fs = require("fs");
const { PutObjectCommand, S3Client } = require("@aws-sdk/client-s3");
UploadImages Function [Backend post request] 📤
Here's the complete UploadImages function. I have added the inline comments for a better understanding of what the code does but in a nutshell,
The code uses the multiparty package to parse the incoming request and retrieve the files that were uploaded. It then initializes an Amazon S3 client using the aws-sdk package and uploads each file to the specified S3 bucket. Finally, it generates a link for each uploaded file and sends it back as a JSON response. The code assumes that the AWS access keys are stored in the process.env.S3_ACCESS_KEY and process.env.S3_SECRET_ACCESS_KEY environment variables, and that the bucket name is specified in the bucketName variable.
💡 S3_ACCESS_KEY is your 'Access key ID' and S3_SECRET_ACCESS_KEY is your 'Secret access key' provided when we created the Bucket from AWS Console.
One important thing to note is that you have to replace the regionName and bucketName with your own. you can find your region by going to the S3 Services.
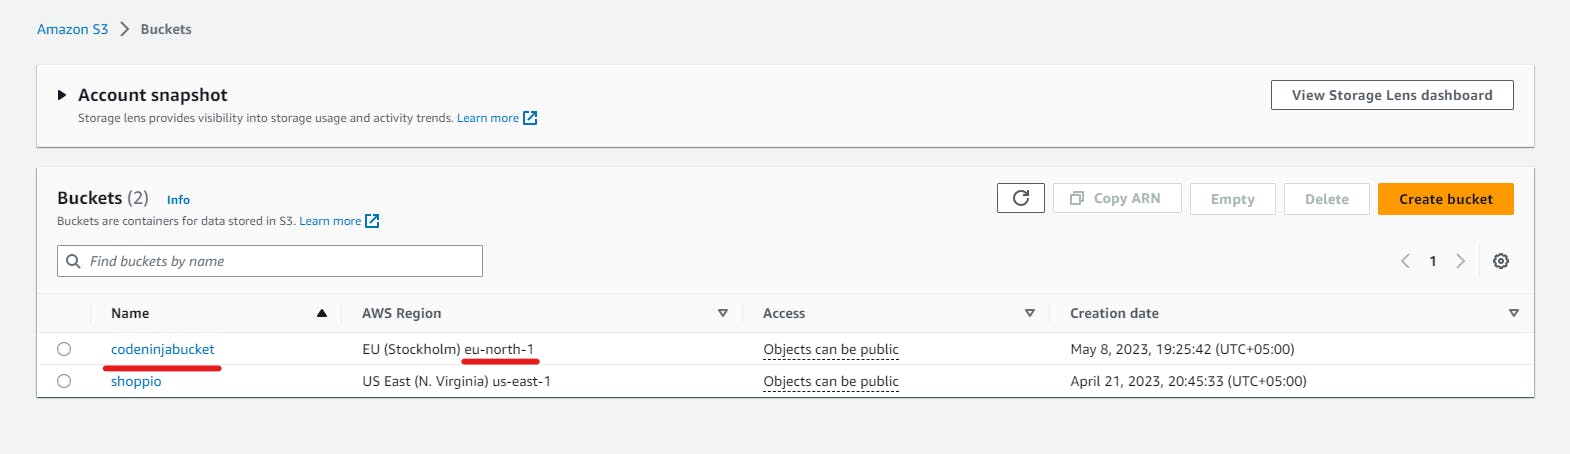
So, here my region is eu-north-1
const bucketName = "codeninjabucket";
const regionName = "eu-north-1";

const uploadImages = async (req, res) => {
  const form = new multiparty.Form(); // create a new form object to parse the incoming request

  const { fields, files } = await new Promise((resolve, reject) => {
    // wait for the form to parse the request and extract fields and files
    form.parse(req, (err, fields, files) => {
      // use the form object to parse the request and retrieve fields and files
      if (err) reject(err); // if an error occurred, reject the promise with the error
      resolve({ fields, files }); // otherwise, resolve the promise with the fields and files objects
    });
  });

  console.log("files", files); // print out the files object for debugging purposes

  console.log(process.env.S3_ACCESS_KEY, process.env.S3_SECRET_ACCESS_KEY); // print out the AWS access keys for debugging purposes

  const client = new S3Client({
    // create a new Amazon S3 client object
    region: regionName, // specify the S3 region
    credentials: {
      accessKeyId: process.env.S3_ACCESS_KEY, // specify the AWS access key ID
      secretAccessKey: process.env.S3_SECRET_ACCESS_KEY // specify the AWS secret access key
    }
  });

  const links = []; // create an empty array to hold the links for the uploaded files

  for (const file of files.file) {
    // iterate over each file that was uploaded
    const ext = file.originalFilename.split(".").pop(); // extract the file extension from the original file name
    const newFilename = Date.now() + "." + ext; // create a new filename with the current timestamp and the original file extension

    console.log(newFilename); // print out the new filename for debugging purposes

    await client.send(
      // use the S3 client object to upload the file
      new PutObjectCommand({
        Bucket: bucketName, // specify the name of the S3 bucket to upload to
        Key: newFilename, // specify the new filename for the uploaded file
        Body: fs.readFileSync(file.path), // read the file contents from disk and upload them to S3
        ACL: "public-read", // specify that the file should be publicly readable
        ContentType: mime.lookup(file.path) // specify the content type of the file
      })
    );

    const link = `https://${bucketName}.s3.amazonaws.com/${newFilename}`; // generate a link for the uploaded file
    links.push(link); // add the link to the array of links
  }

  res.status(200).json({ links }); // send the links back as a JSON response
};
Bonus: Retrieve all images 🖼️🔍
In the above code, we get the link to the files that we have uploaded to the Bucket. But what if we want to retrieve the links of all the images that we have uploaded, the following function uses the @aws-sdk/client-s3 package to fetch the URLs of all the objects in an S3 bucket and return them in a JSON response. The function first creates a new S3Client object and sends a ListObjectsCommand to the specified S3 bucket to retrieve information about all the objects in the bucket. It then maps over the list of objects and generates URLs for each one. Finally, it sends a JSON response containing an array of the URLs.
const fetchURLs = async (req, res) => {
  // Create a new S3Client object with the specified region and AWS access key and secret access key.
  const client = new S3Client({
    region: regionName, // specify the S3 region
    credentials: {
      accessKeyId: process.env.S3_ACCESS_KEY, // specify the AWS access key ID
      secretAccessKey: process.env.S3_SECRET_ACCESS_KEY // specify the AWS secret access key
    }
  });

  // Create a new ListObjectsCommand object with the specified S3 bucket name.
  const command = new ListObjectsCommand({
    Bucket: bucketName // specify the name of the S3 bucket to list objects from
  });

  // Send the ListObjectsCommand and wait for the response.
  const response = await client.send(command);

  // Map over the list of objects in the response and generate URLs for each one.
  const urls = response.Contents.map((obj) => {
    return `https://${bucketName}.s3.amazonaws.com/${obj.Key}`;
  });

  // Send a JSON response containing an array of the generated URLs.
  res.status(200).json({ urls });
};
Conclusion ☑️
In conclusion, we have seen how to upload and fetch images from an S3 bucket using Node.js and the AWS SDK. We started by setting up the AWS SDK and creating a function to upload images to the S3 bucket. Then, we created a function to fetch the URLs of all the objects in the bucket.
You can check out the sandbox embedded in this blog to see how the frontend is making requests to these functions. In the case of frontend, once you have managed to get the images and make a FormData object, you can use the following code to make an upload POST request using Axios 🚀:
const makeReq = async () => {
  const { data } = await axios.post(
    "https://iy39vj.sse.codesandbox.io/upload",
    imagesFormData
  );
};
Similarly, you can make a GET request to fetch all the images from the S3 bucket from the frontend using the following code snippet 🌟:
const retrieveImages = async () => {
  const { data } = await axios.get(
    "https://iy39vj.sse.codesandbox.io/fetchUrls"
  );
  const { urls } = data;
  console.log("urls", urls);
};
With these code snippets, you can easily integrate the backend functionality into your frontend and build cool applications using AWS S3.
The code is written, the bugs are beaten! 🐛 🥋 Until next tutorial, stay curious and keep coding 💻🚀